-
3-minute read
-
24th June 2016
How to Use Microsoft Word’s Captions in an Academic Essay
Whether it’s adding a diagram to your methodology chapter or presenting your data in a series of graphs, images are a great way of enhancing the visual impact of an essay.
But it’s important to label all charts and figures clearly. The easiest way to do this is with Microsoft Word’s captions, which also enable use of a few additional formatting options.
How to Add Captions to an Image
Adding a caption to an embedded image is simple:
- Right click on the image/chart and select ‘Insert Caption…’.
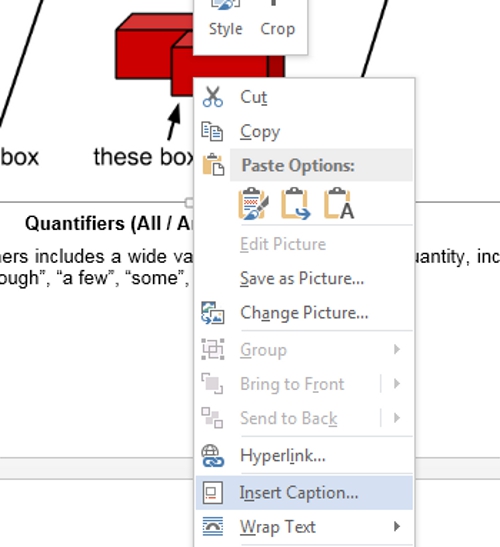
- In the new window, pick the label you want to apply; the most commonly used are ‘Figure’ (pictures/diagrams) and ‘Table’ (charts/graphs).
- Choose where you want your caption to appear (above or below the image/chart).
- Add text that describes the image/chart (e.g. ‘Figure 1: Results from Initial Testing’).
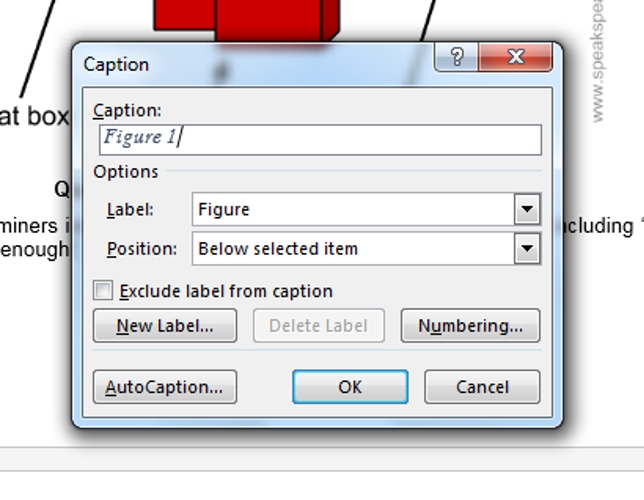
And bingo! You now have a caption for your image.
If you want to add a caption to something other than an embedded image, you have two options:
- Select where you want the caption to appear, go to the ‘References’ tab and click ‘Insert Caption’ (after which, follow steps 2-4 above).
- Select the ‘Caption’ font from the ‘Styles’ menu and type (this is particularly handy if you don’t want to use Microsoft Word’s default caption numbering/labels).
How to Customise Captions
You can change the style of captions via the ‘Styles’ menu on the ‘Home’ tab in Microsoft Word. To do this, simply:
Find this useful?
Subscribe to our newsletter and get writing tips from our editors straight to your inbox.
Subscribe to Beyond the Margins and get your monthly fix of editorial strategy, workflow tips, and real-world examples from content leaders.
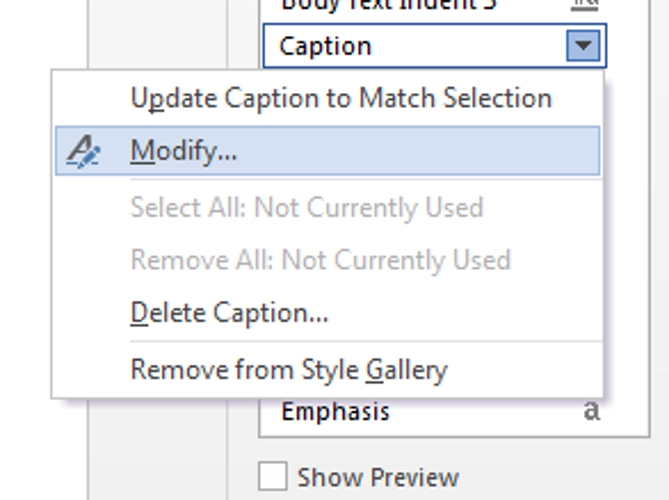
- Open the ‘Styles’ sidebar by clicking on the little arrow in the bottom right.
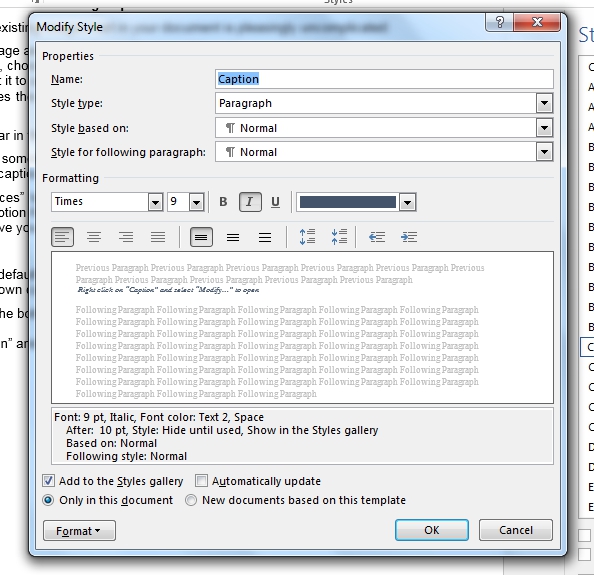
- Find the ‘Caption’ style in the list and right click; select ‘Modify’.
- Choose the font/formatting options you want for your captions.
If you want to use different caption styles in different parts of your document, you’ll need to create a new ‘Caption’ style each time:
- Click the ‘New Style’ button on the bottom left of the ‘Styles’ sidebar.
- Name your new style (e.g. ‘Caption 2’, or something more imaginative).
- Select ‘Caption’ in the ‘Style based on’ menu.
- Modify the basic caption style to suit your requirements.
Making the Most of Captions
One of the best things about Microsoft Word’s captions is that you can generate an automatic list of figures/charts. This gives your reader an overview of the figures used and helps them to navigate the document.
To do this, you need to:
- Position the cursor where you want your list of charts/figures to appear.
- On the ‘References’ tab, select ‘Insert Table of Figures’.
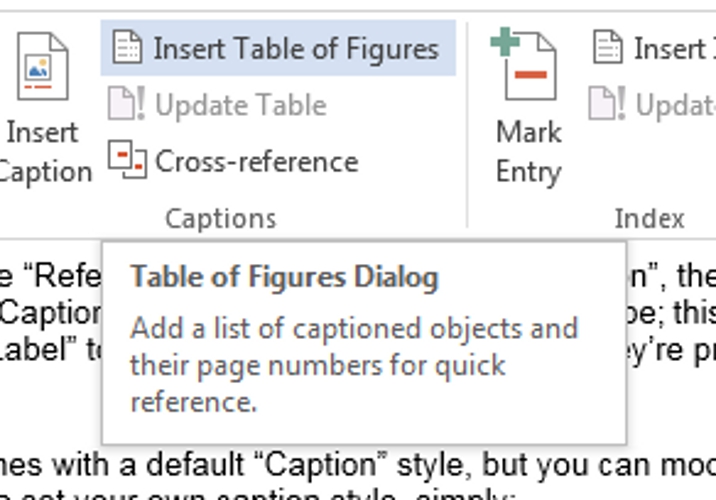
- In the pop-up window, choose the label type you want to list (pick ‘Figure’ for a list of figures, ‘Table’ for a list of tables/charts, etc.).
- Click ‘OK’.
This will make a list of charts/figures appear with the text you used in each caption. If you make any further changes to your captions, you can update the list using the ‘Update Table’ button.


