-
3-minute read
-
26th April 2020
How to Use the Spellchecker in Google Docs
The spellchecker in Google Docs is a useful tool, even if it can’t replace the services of an expert proofreader. However, to use the spellchecker effectively, you need to know how it works. This post will look at:
- How to set the proofing language to your chosen dialect.
- How to run a spellcheck and how Google Docs highlights errors.
Read on below to find out how to use the spellchecker in Google Docs.
How to Set the Proofing Language
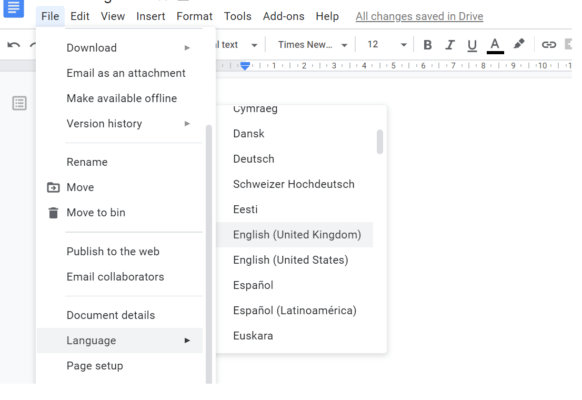
Setting the proofing language for a Google Docs document is simple:
- Select the text you need to spellcheck.
- Go to File > Language.
- Choose the language or dialect required (e.g. English [United Kingdom]).

Google Docs will then highlight errors as you type with red (spelling) or blue (grammar) underlining. Clicking on the underlined word will offer a suggested correction (see below for information on reviewing suggestions).
How to Run a Spellcheck
You can also run a spellcheck manually in Google Docs. The easiest way to do this is to click on the spellcheck icon in the toolbar. This looks like an ‘A’ with a tick underneath, as shown in the image below.

Alternatively, you can access the spellchecker by:
Find this useful?
Subscribe to our newsletter and get writing tips from our editors straight to your inbox.
Subscribe to Beyond the Margins and get your monthly fix of editorial strategy, workflow tips, and real-world examples from content leaders.
- Going to Tools > Spelling and Grammar > Spelling and Grammar Check.
- Using the shortcut Ctrl + Alt + X (or Command + Alt + X on Mac).
Google will then check the full document for spelling and grammar errors. If it finds something it thinks is an error, it will create a pop-up with a suggested correction. Your main options then will be:
- Click Accept to accept the spellchecker’s suggested correction.
- Click Ignore to leave the original spelling in place.

You can also click the three dots in these pop-ups for advanced options:
- Accept all – Change all instances of a typo to the suggested correction.
- Ignore all – Ignore all instances of the supposed error.
- Add “[Word]” to dictionary – Adds the spelling to your personal Google dictionary so that it won’t be highlighted in future spellchecks.
- View personal dictionary – View and edit your personal dictionary.
Adding a term to a dictionary is very useful if you’re using a non-standard spelling, proper name, or technical word that Google doesn’t recognise. However, make sure the spelling is correct before you add it!
Can You Trust the Spellchecker in Google Docs?
The spellchecker in Google Docs is useful, but no automated spellchecker is infallible. It may not recognise stylistic preferences, proper nouns, or technical terms. In addition, Google Docs doesn’t currently differentiate between regional spellings (e.g. it accepts ‘color’ as correct in UK English).
To be sure your document is error free, then, you need a human proofreader. Sign up for a free proofreading trial today to find out more.


