Many things go towards making a well-formatted document. Paragraph spacing, for instance, adds a gap between blocks of text in a document. This ensures that your written work is evenly spaced and neatly presented. And with Microsoft Word, it’s reassuringly simple to do.
How to Add and Remove Paragraph Spacing
Although you could just hit ‘Enter’ twice after each paragraph in a document, the paragraph spacing options in Microsoft Word offer an even easier way of adding a space between passages. They also make sure that your formatting is consistent throughout.
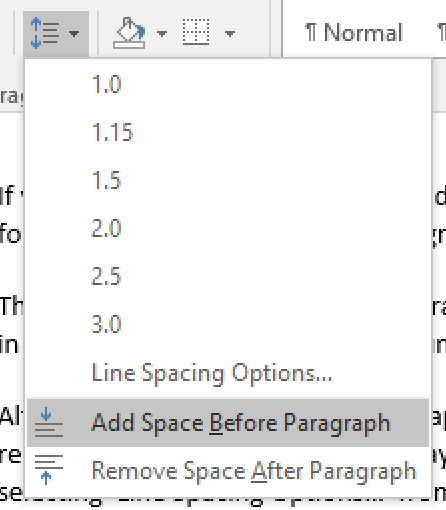
The most basic option in Word (on PC) adds or removes a space before or after paragraphs. Simply:
- Select the text you want to format
- Go to the ‘Paragraph’ section of the ‘Home’ tab in Microsoft Word
- Select the ‘Line and Paragraph Spacing’ menu

The Line and Paragraph Spacing menu. - Pick where you want to adjust the spacing from the bottom of the menu (the option will say ‘Add’ if there’s no spacing there yet, or ‘Remove’ if formatting has already been applied)

This will add a default space as selected. Generally, adding a space after paragraphs is more common. However, you may want to use spacing before some bits of text, such as headings, to clearly separate them from the passages before and after.
Custom Spacing
If you’re following a specific style guide, or if you just want more control over how your document is formatted, you can set custom paragraph spacing values. There are two main ways to do this.
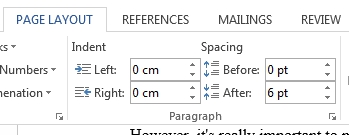
The first involves going to the ‘Paragraph’ section of the ‘Layout’ tab. Here, you can adjust the values in the ‘Before’ and/or ‘After’ boxes under ‘Spacing’. This also works on Word for Mac.
Find this useful?
Subscribe to our newsletter and get writing tips from our editors straight to your inbox.

Alternatively, open the main ‘Paragraph’ menu by clicking the little arrow in the bottom right of the relevant section on the ‘Home’ or ‘Layout’ tabs (in Word for Mac, you can reach this menu by selecting ‘Line Spacing Options…’ from the dropdown menu on the ‘Home’ tab).

Once you have opened this menu, you need to:
- Go to the ‘Spacing’ section in the new window
- Set the values in the ‘Before’ and ‘After’ boxes as required
- Click ‘OK’ to set the spacing for your selected text

You can also adjust these settings when customising a ‘style’ in Microsoft Word. This will then apply the selected spacing to all passages formatted using the modified style.
Finally, you can adjust the spacing in a document by selecting one of the predefined settings from the ‘Paragraph Spacing’ menu under the ‘Design’ tab. However, these apply to the entire document and also adjust the line spacing, so it is usually better to use the options described above.


