


The spellchecker in Microsoft Word is a useful tool (even if it can’t replace proofreading). However, to make the most of this tool, you may need to check its settings first. In this post, for instance, we’re looking at three ways of customising the spellchecker in Microsoft Word:
- Setting the proofing language
- Adding and ignoring specific terms via the contextual menus
- Editing and creating custom dictionaries
1. Setting the Proofing Language
The simplest way to customise the spellchecker in Microsoft Word is to change the proofing language. If you are writing for a British audience, you will want to use British English. This will make sure the spellchecker looks for UK spellings (e.g. ‘colour’ instead of the US English ‘color’).
To check and set the proofing language in Word, all you need to do is:
- Select the text that you want to run a spellcheck on
- Look for the current language on the status bar
- To change the language setting, go to Review > Language > Proofing Language on the main ribbon (or Tools > Language in Word for Mac)
- In the new window that opens, select the language required and click OK

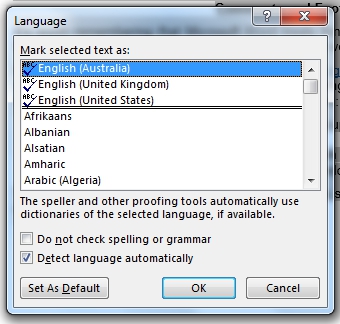
This will change the proofing language used for the selected text.
2. Adding and Ignoring Terms
As well as changing the proofing language, you can add individual terms to the spellchecker dictionary. This is especially useful when Microsoft Word does not recognise a proper noun or a technical term, as the spellchecker will underline it in red even if it is spelled correctly.
Find this useful?
Subscribe to our newsletter and get writing tips from our editors straight to your inbox.
To stop these false positives, all you need to do is right click the highlighted term and select Add to Dictionary from the menu. The term is then added to the dictionary for all documents.

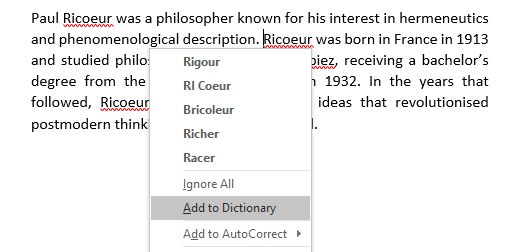
If you don’t want to make a permanent change, you can instead tell the spellchecker to ignore certain words. If you click Ignore while running a spellcheck, for instance, it will overlook a single use of that term. But you can also click Ignore All to stop the spellchecker from highlighting the term anywhere in the current document.
3. Customising the Spellchecker
Finally, for complete control over the spellchecker, you can edit your dictionary. This ‘custom dictionary’ includes any terms that you have selected via the Add to Dictionary option mentioned above. But you can also add and remove terms from the dictionary by:
- Going to File > Options > Proofing in Word for Windows (or Preferences > Spelling & Grammar in Word for Mac)
- Clicking Custom Dictionaries
- Selecting your custom dictionary (usually named CUSTOM.DIC)
- Clicking Edit Word List
- Adding or removing terms as required and clicking OK to confirm

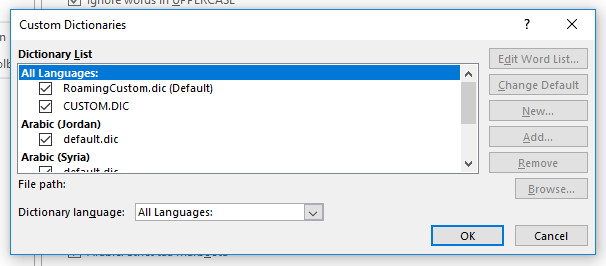
You can also import and create custom dictionaries here if required for particular documents.