


The ruler tool in Microsoft Word provides a simple way of making sure different parts of your document are aligned. It also lets you quickly adjust margins and indents in your work. So, how does it work? Let us explain.
How to Display the Ruler in Microsoft Word
To show the horizontal and vertical rulers in Microsoft Word, simply:
- Go to the View tab on the main ribbon.
- Click the Ruler checkbox.
This should then display the rulers on the top and left margins in the Print Layout view. You can then change the unit of measurement to suit your requirements.


How to Adjust Margins Using the Ruler
On the ruler, the grey areas represent the margins of your document. The white space between these represents the part of the page writing will appear within.
To adjust a margin in a document using the ruler tool:
- Hover the cursor at the edge of the margin you want to adjust.
- When the double-headed arrow cursor appears, click and drag to increase or decrease the margin size.
However, this way of adjusting margins can be inexact. As such, if you need to ensure precision, we suggest using the standard margin options in Word.
How to Use Indentation Tabs
You should also be able to see some white shapes on the edge of the ruler. You can use these to quickly adjust indentations in a document. All you need to do is place the cursor in text you want to indent, then drag the relevant shape on the ruler.

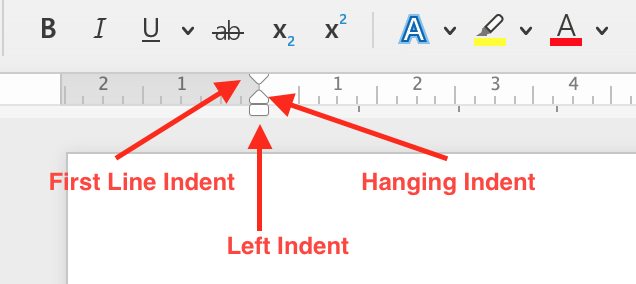
The trick, then, is making sure you select the correct tab! On that note:
Find this useful?
Subscribe to our newsletter and get writing tips from our editors straight to your inbox.
- To adjust the left indent (i.e. the indentation of text from the left margin), drag the rectangle shape on the ruler to move all the tabs at once. This will then adjust all the text in the paragraph where you placed the cursor.
- To add or adjust a first line indent, drag the arrow at the top of the ruler. This will indent just the first line in the paragraph where you placed the cursor.
- For a hanging indent, select and move the triangle just above the rectangle shape (this will also move the left indent tab). Doing this will indent each line in the selected paragraph after the first line.
- To adjust the right indent, simply click and drag the arrow on the righthand side of the rule. This will indent text from the right margin.
If you’re not sure which tab is which, moreover, simply hover the cursor over any of the shapes on the ruler. Its name will then pop up, helping you to pick the right one.
As with margins, though, adjusting indents via the ruler can be imprecise. To ensure consistency, you may want to check the size of indents via the paragraph menus.
Toggling the Vertical Ruler
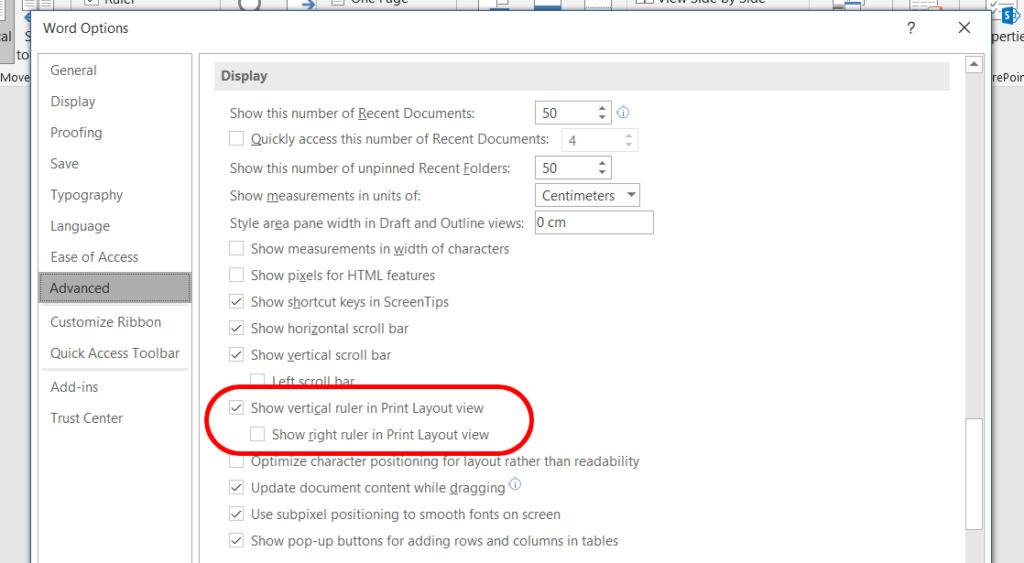
If the vertical ruler doesn’t display with the horizontal one, you may need to turn it on via the options menu. To do this in Word for Windows:
- Go to File > Options > Advanced and scroll down to Display.
- Click the Show vertical ruler in Print Layout view checkbox (you can also select to display this ruler on the right margin here).
- Click OK to accept the change.

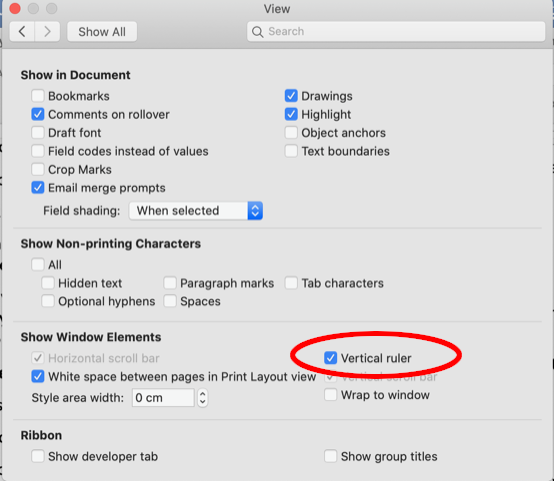
In Word for Mac, meanwhile, the process is:
- Go to Word > Preferences via the toolbar.
- Select View under Authoring and Proofing Tools.
- Check Vertical ruler under Show Window Elements.
- Close the preferences pane to save your changes.

You should now see the vertical ruler running down the left side of your document.
Expert Formatting Services
If you want to be sure your documents look perfect, our formatting services could be exactly what you need. All you need to do is add the ‘Formatting’ option when you upload a document for proofreading, then let us know what formatting to apply!